Introduction

The 57 acres that comprise Cedar Ridge Farm are located in the beautiful rolling hills of South Central Kentucky. My wife, our four children, and I are on a homesteading adventure as we work toward increased self-sufficiency. We grow much of our own food and enjoy being in touch with the agrarian roots of our lives.

One of the major projects we have undertaken is the building of our own home. The house we're building has three major distinguishing features: 1. we're building it without incurring any debt; 2. it is a timber frame structure; and 3. the exterior walls will be plastered straw bales. We live debt and mortgage free, and building our house with that approach makes perfect sense. Large timbers in a home possess a beauty and project a sense of strength, stability, and warmth that we want in our home. Straw bale walls provide insulation and make ecological sense. This blog is a record of our home-building project.
Showing posts with label straw bales. Show all posts

Sunday, June 17, 2012

Continuing to put mud on the walls

There were several things to do this last week that did not involve the house, but we were still able to mix and apply several batches of plaster.

On Monday, the boys and I worked all day plastering the walls in the laundry room. We mixed seven batches of plaster and put them on the walls. 008Each batch weighs around 240 pounds wet. Once it dries, it’ll lose about 40 pounds per batch (a five-gallon bucket of water). So, that’s 1,400 pounds of thermal mass on just these four walls alone. If we count all the walls we’ve done so far (including the walls we did on Friday that I haven’t mentioned yet), it figures out to about 3,500 pounds of thermal mass, and we’ve only put the first coat on a few of the walls. There is still the second coat on the straw bale walls to be figured and a finish coat on all the walls. 009I find it interesting to think about the mass of the plaster that will help moderate temperature and humidity (clay is good for that) when the house is done.

I took the photos today of the plaster we applied last week. So, you can see that it is drying nicely. It’ll be cured within the next week, I expect. The places where it is thicker will take longer to dry thoroughly, but there’s not really any hurry. The only concern is mold. If the weather cools off and it is damp, the plaster won’t dry quickly like it does when it is warm with a good breeze blowing through the house. We had a few areas on the 013walls that we packed with slip straw last fall that grew some mold on the surface because the drying conditions deteriorated after we packed them.

I’m not really worried about the mold. It seems to originate in some of the straw that is used in the mixes, probably because of the presence of mold spores. It can only survive and grow in moist conditions. I have discovered a safe way to kill it and prevent it from spreading – white distilled vinegar. We sprayed walls that grew mold after packing last year, and it took care of the problem. There have been a few places where some mold appeared on the surface of the plaster when the drying conditions 004were not ideal recently. A little vinegar kills it quickly. I’m sure if it was a major case, not just a little here or there, that there might be some other remedies needed, but this one is working for us.

So, after doing all the walls in the laundry room, we didn’t get back to plastering until Friday. We only had the afternoon, and we worked in the guest room. We were able to get 2 walls done. We’ll finish this room tomorrow if all goes well. And, we’ll do a few more walls, too. It is reasonable for us to finish the first coat on all the downstairs walls this week.


002005

Sunday, June 10, 2012

Putting mud on the walls

Since we have all the interior walls packed, it was time to focus on plastering. We did a little plastering a few weeks ago – just one batch. The boys both commented that they would rather play in the mud than pack the walls. So, they seemed happy to plaster.

We started with the dining area wall on Tuesday after doing some cleaning up on Monday. This was the largest of straw bale walls to be plastered, 009considering walls as areas between posts or on one side of a specific rooms. This wall is 9 feet tall and 14 feet wide with only one window. The thing with plastering the straw bales is that we have to work the plaster into the straw. The goal is to get it pressed into the bales an inch or two. Also, around the windows where I curved the bales, I really have to work the plaster in. I used chicken wire on the curves. So, I have to press the plaster through the wire and work it into the straw with my fingers. When the ends of the straw face outward, it’s easier to work the mud in, but when the straws lay cross ways, like most do in the curves and on the ends of bales, it takes more effort to work it in.

So, I worked the plaster in on the window curves while the boys worked on the sides and below. 017Once I got the curves done, I helped finish up the rest of the wall and make sure it was all pressed in to the bales as desired.

On Wednesday, we decided to plaster some of the slip straw walls. Having done a little of this previously, we knew that it goes on much easier than the straw bale walls. You don’t have to work it in the same way. Our process involved the boys smearing the plaster on the walls with their hands. I would follow with a trowel to smooth and even out the plaster. We were able to finish the wall below the stairs, the wall along the stairway, and almost all of the walls in the hallway, 007006including in the linen closet but not the cabinet above.

We actually finished these walls in the morning and then spent time in the afternoon sifting some more clay dirt. We’re using clay that we excavated when digging the root cellar. I ran the tiller through the clay pile to loosen things up and then we screened it through 1/4” hardware cloth to remove rocks and larger clods of clay. This makes a nicer mix of plaster. We screened it into half of a 275 gallon tote – 013the same thing we mixed the slip straw in, only we put the metal frame around it to give it some rigidity.

On Friday, we plastered in the mudroom. We were able to get all of the walls plastered in there except for a small section above the interior door. We had two walls of straw bale and two of slip straw. There were curves around and above one window and the exterior door.

I calculated that in the three days of plastering that we mixed and applied 1,500 pounds of plaster. Once the water dries out of it, that is 1,200 pounds of plaster. This is only the first coat, too. 011The straw bale walls will require a second heavier coat to fill in the irregularities, maybe even a third coat. The slip straw walls will only require one more coat. At this rate, we will have several tons of thermal mass on the walls which should help moderate the interior temperature during the summer and winter.

Each batch of plaster consisted of 2 buckets of sand, 1.5 buckets of clay-rich dirt, one bucket of water, and half a bucket of chopped straw. I mixed it in the concrete mixer, using my hand to help ensure that the sand was mixed through properly. It made a nice easy to apply plaster.

We’ll be mixing up a lot more in the coming weeks.

Friday, June 1, 2012

Window seats upstairs

A while ago I finished curving the straw bales around all of the windows downstairs and installing 3/4 plywood window sills. Upstairs, I hadn’t gotten all of the window sills/seats put in and had one windows to curve the bales on either side. I got those done today.

After finishing packing slip straw in all the walls, some of the plywood I had been using for forms was now available. I just had to rip the pieces to the proper width and cut them to the right length so that I could install them. There was only one window that needed the bales curved, the one on the west end upstairs.

It looks good to have the windows finished. I still need to do above them, but that will entail putting in some nice boards rather than rounding bales like I did downstairs. I’ll do that later.

001004006

Sunday, May 13, 2012

Water in a wall (or, I don’t like roof leaks)

I was trimming the ends of some bales in the kitchen this week (one of those little things I hadn’t previously done) when my younger son noticed a black spot on the ceiling near where I was working. He asked what it was. When I looked, I saw that it was caused by a mushroom that was now dead, but there were some live ones peeking out of the straw bale wall. That wasn’t something I wanted to see.

Sticking my hand into the straw in that section of wall, I could feel moisture. Of course, the mushrooms already told me there was moisture in the wall. So, I started pulling straw out of the wall. Some of it toward the center of the wall was fairly damp. Nothing sopping wet, though. The moisture extended down from the 006ceiling in a section of about 1.5 courses of bales and less than 12” wide. We removed the damp straw from the house, and I sought to determine the source of the moisture. Although it may be hard to see, the photo to the right shows the area from which I removed the damp straw. The “stick” in front of the void is one of the sapling pins we used to tie the bales together in the wall.

My first thought was that it was from condensation under the metal. I have a 2” ventilation space under the roof metal. Before we put up the kitchen ceiling, I added flashing to keep water outside of the house from this space if it was ever present. I figured that the flashing just wasn’t doing the job. So, I bought some 24” aluminum flashing and redid the job better than before.

It rained last night, and this morning I checked to see if the leak was taken care of. Unfortunately, it wasn’t. This did help narrow down the area through which the moisture is entering the house. It appears to be around the chimney flashing on the roof metal. I have been wanting to do more with the chimney flashing anyway. This leak provides motivation to do it sooner rather than later. I used a piece of flashing to redirect the water from the leak away from the straw bales for now. I’ll be fixing the cause of the problem this week.

I’m thankful that the problem presented itself at this point in time and not several months later.

Thursday, May 5, 2011

Window sills and curving bale corners

I’ve considered different options for the window sills in the house. One of the earlier ideas was to set stones in concrete – done right, this makes a very nice window sill/seat. Later, I decided to make them with wood, and I’ve been pondering upon how to build them.

On the first day of this week, I planed some poplar boards with the intention of using them for the window sills. Dad and I tried out the tongue and groove router bits I recently purchased on a couple of the boards. My idea was to put in a framework using 2x2s that the poplar boards would be nailed in to. As we routed out a couple tongues and grooves, I continued thinking about my method. As a result, I changed my plan for what to do.

I decided to use some 3/4” plywood as a sort of sub-sill and install finished boards later, probably using the same material as what I will use on the floor in the house. The plywood will give me a solid foundation to nail the finish boards to, and it actually will install more easily than the previous method I had in mind.

Wanting to try it out, I decided to start in the master bedroom. The first task was to shape the corners of the bales on the sides and above the window. I used my electric chain saw to knock off the corner of the bales on both sides and to cut 3/4” out 050of the top of the bales below the window (to set the plywood at the right height).

Once I had the sides curved and the bales above shaped (I describe the basic process below), I cut plywood to install for the sill. I attached it below the window to some thin strips of wood I nailed to the framing below the window, setting the top of the plywood even with the top of the 2x4 at the bottom of the window. The finished boards will will butt up against the window on top of the 2x4 framing the bottom of the window opening. I also set some 2x2s flush with the exterior surface of the bales below the sill to provide extra support. 006It turned out well. The photo of the window also shows one end of the opening for the sliding glass door which I also shaped.
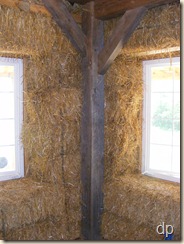
Today, I worked on the living room windows. Looking into the corner, you can see how they looked before I started. Although we tried to stack them straight, he ends of the bales were uneven. It’s quite easy to remove straw from the ends of the bales in order to make them more even.

The first step in shaping the bales around the windows was to cut the corners off. My electric chainsaw worked well for this. 013I found that it wasn’t necessary to try to round the corners.

The next step was to cut a length of poultry netting/chicken wire to fit the height of the window. I stapled one edge into the 2x4 framing on the side of the window. Then, I stuffed straw into the gaps between bales and added straw where the 014bale ends needed built out a bit. The chicken wire serves to hold the straw against the bales and to form the desired curve.

I pulled the chicken wire around the curve and anchored it to the bale wall with a short stick behind one of the hard wood sapling pins in the wall. I worked from bottom to top, pulling the wire tight, anchoring it, 016stuffing straw where needed, pulling the wire tight, adding another anchor, etc. 017When I reached the top, the corner was rounded, and the wire was tight.
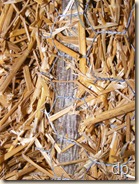
The final step was to staple the wire securely to the pin in the wall. With it stapled, I removed the anchor sticks and was ready for the other side.

When we stacked the bales, we laid a 2x6 across the window opening and secured it to the framework above so it wouldn’t sag. Then, the next course of bales was added on top of the 2x6. I needed to not only curve this edge above the windows, but I also needed to provide a 019surface for the plaster to adhere to later.

Again, I knocked the corner of the bales off with the chainsaw and then attached chicken wire to the top 2x4 of the window framing. I put loose straw on the wire and stuffed it into some voids. Then, I pulled it up tight to the bales above the window, pounding it into the curve in order to shape it how I wanted it. A 2x4 of the bale shelf is exposed one bale course above the window, and I stapled the wire to this. I completed this process in sections across the window.

With both of the double sets of windows in the living room shaped, it was time to install the plywood for the window sill. While I was cutting off the corners earlier, I also cut the height of the bales below the window a little. The first step in doing that was to cut the strings of the bales (to keep the strings from getting tangled in the saw). Since the bales were already securely in the wall, 031they weren’t going to go anywhere or fall apart with their strings cut.

I nailed a strip under the windows to attach that edge to and then laid the pieces of plywood I cut in place. With them nailed under the window, I attached some vertical pieces flush with the bale surface under the plywood. I used some pieces of oak that was close to 2”x2” which I had.

The plywood extends past the inside plane of the bales because I want the plaster to come up under it rather than in front of it. The plaster will actually help provide additional support for the sill. It should be solid since it’s attached front and back and rests on top of the straw bales.


042

Sunday, April 24, 2011

Light clay straw infill, a.k.a. slip straw

008

The plan for our interior walls is to pack them with straw coated with clay slip which will then be plastered. This method is referred to as light clay straw infill or as slip straw.

The process involves mixing clay slip which is a clay-water solution about the consistency of heavy cream. The clay slip is then used to coat loose straw, kind of like putting salad dressing on salad. The straw doesn’t need to be soaked, just coated with the clay slip.

Packing the clay-straw mix into the walls involves the use of moveable forms. I have some 1/2 inch plywood cut into 24” by 48” pieces. Two of these are screwed onto opposite sides of the wall, creating a cavity into which the clay-straw can be packed. The clay-straw is put between the forms and then tamped firm. We use some 1”x1” boards for tamping.

Once the cavity has been packed to the top of the plywood forms, two more forms are added above the first ones. The new cavity is then packed full of the clay-straw mix in the same way. When it is packed full, the first two forms are removed and placed on the wall above the second set of forms. The process of packing and piggy-backing forms continues until you reach the top of the wall.

The boys and I tried out this method late last summer on one wall in the house, and I was impressed with how well it worked. I learned about the technique by reading about it and watching a couple of videos on YouTube. Using slip straw will allow me to plaster the interior walls like the exterior straw bale walls. It will provide some sound insulation between rooms, and it means I don’t have to use drywall. That, and it is inexpensive, using straw left over from building the exterior walls and clay I dug out of the ground.

Today, the boys and I decided to pack a wall, if we could. 007We were able to infill two cavities between studs on one wall which is 9.5 feet high.

The photo on the right shows our progress at lunch time. We had finished filling nearly to the top of the wall and had removed the lower forms. Because there wasn’t enough space above, we couldn’t just piggy-back the lower forms above the others. I actually removed all the forms, secured ones near the top of the wall, and then put the others directly below these. Adding the forms below helped to assure that we didn’t push any of the material out of the wall when tamping it firm.

You might notice that there are boards attached to the plywood. I bought 1/2” plywood for the forms, but it is really not thick and rigid enough – it will bow out some when the clay-straw is tamped in firmly. I screwed some 1”x2” boards to them to provide more rigidity. Thicker forms would also work, of course.

One of the challenges is what to do when you reach the top of the wall. The top plate of the wall and the ceiling are in the way for feeding in more clay-straw mix015 and are in the way for tamping it into place between the forms. The solution that we tried out today was to put a form on one side all the way to the top of the wall while leaving the one on the other side several inches lower. Then, into the space we packed some heavy clay-straw mix – basically a cob. This mix sticks together better in this application and will stay in place better than the light clay straw mix. 012This solution seemed to work well, as long as there’s no problem with it drying properly.

We learned some lessons from today’s activity. One is to put the straw in to be packed in small quantities rather than a lot at a time. The smaller amount will be more evenly packed within the wall. Larger amounts tend to not get packed all the way and leave voids in the wall. The voids on the surface of the wall are the only ones that are visible, and they will be filled with plaster later on. So, it’s probably not that big of a deal, but it is nice to get the material packed in firmly, though.

Another lesson is to pay particular attention when starting to fill between a new set of forms. For some reason it is at this point that the most visible voids and loose packing seems to occur. It might be that we would start with too much straw, but I’m not sure. I just know that we need to take a little extra time and pay a bit more attention to the filling and packing at this point in the process.

A third lesson is to be careful around electrical wires in the wall. I ran the wires for the outlets in this wall about 12” from the floor. My crewThe straw has to be packed on either side of the wire, but it’s quite easy to hit it with the tamping stick. It might have been better to have routed the wire along the bottom of the wall to eliminate this minor hassle. I thought that it would be less of an issue than it was today and that it would also help to hold the clay-straw in the wall.

We are happy with what we accomplished today. It will take it a few days to dry. As long as the weather is not too cold or too humid, it ought to dry well. We’ll be keeping an eye on it.

Tuesday, October 12, 2010

Upstairs bale walls

Today, I didn’t work much on the house. I put some plastic up to protect the bales that were exposed. Just as I was finishing, it began to sprinkle. It didn’t amount to much, but it was good to get them covered. Tomorrow, I hope we can get all of the walls pinned. The idea is to have them ready to be plastered during the mud party on Sunday.

I took a few photos of what we accomplished yesterday so that I could share them. It’s really neat to see the house with the walls stacked.

northwest corner

The stairs will come up near where the ladder is in the next photo. There is a small landing at the top of the stairs between the two upstairs bedrooms. We’re planning a cozy, little reading area by the window on the landing. 

Looking across to the west bedroom, there will be a wall between the two posts making a storage area under the eaves. There will also be a wall on the near side of the room where the ladder is leaning.

Looking toward the east bedroom, you can see that the windows on the back of the house are set quite low. They are one bale height above the floor which will make them really cozy with the built in window seat. There will be closets on either side of the back window in each bedroom, making the window feel more like a dormer.

The west window in the west bedroom. All of the large windows in the house, like this one, will have wood sills making comfortable window seats. You can imagine how nice it would be to sit in the window with a good book on a sunny winter day.

Monday, October 11, 2010

Straw bale observations

We stacked the walls upstairs today. Sorry, no photos, because I was busy working. I ought to be able to post some tomorrow, though.

Yesterday, Dad and I brought 136 bales from the barn to the house. When I stopped to think about it, I realized that those bales have been stored in the middle of my barn for over four years. I bought them in the summer of 2006 in anticipation of needing them by August that year (I was overly optimistic, in case you didn’t know).

I’d forgotten what these bales were really like. The man I bought them from grew rye just for straw. He cut it when it had good straw but before it had any grain. I’d forgotten, but he told me that when they baled it, they raked it into large windrows so that it would make large, heavy bales. They are indeed large and heavy, very dense.

One of the things you read about selecting bales for a straw bale home is to be sure to get tight bales. I will tell you that this is good advice. The bales I bought this year are not as tightly and densely baled as the ones I bought four years ago, and it does make a difference in handling them and stacking them into the wall. The tighter, denser bales, although heavier, are easier to work with. You can move them, shove them, kick them, beat them, and generally force them into the spaces where you want them.

For our house, it was really good that we used these tighter bales upstairs. The first course had to be stomped into a tight space between the porch roof and the beams of the timber frame. the top courses had to be coaxed into some hard to get to spaces. These bales held onto their shape and went into some tough places.

The other bales are fine, less you think they aren’t. I just wanted to share my observation about the tightness of the bales. The tighter and denser they are, the better they are for building with.

One other observation from digging into the pile of four year old bales is that they were in great shape. There were several on the top layer that were no good because they’d gotten water onto them (there are a few spots where the roof sometimes leaks a little). I also had a tarp over the top of the pile for the first year or two which held in some moisture that got under the bales – this caused some to mold on top.

However, inside the pile, the bales were tight and in good shape. I figure if these bales can survive in a pile in the barn with the humidity we experience here, they will fair well as walls encased in clay.

On another subject, preparation for the mud party on the 17th is going well. We have several families planning on attending.

Thursday, October 7, 2010

More progress and a work party (ya’ll come)

We are keeping at it and making progress!

I decided to invite friends and acquaintances over for a work party on October 17, 2010. If you’re interested, let me know.

The plan for the work party day is to get as much mud on the bales as possible. In preparation, I’m planning on getting all the bales stacked, one of the living room windowspinned, and ready for plastering before October 17.

Yesterday, we stacked the rest of the bales downstairs (well, except for one above a door). There weren’t a great number of bales because of the many window openings, but it required a bit of retying which takes time. Also, the last course downstairs must be wedged in between the previous course and the bale plate which requires a little effort and some persuasion with the large mallet.

back wallnortheast corner

While Dad and I stacked bales, Danny and Jon plastered the kitchen walls. plaster on front kitchen wallThey did have some help from my younguns for a while. They weren’t able to finish the front wall, but they got a good start.

I’ll be sorting out good bales from those stored in the barn for the upstairs walls. So far we’ve used about 280 of the 300 bales I bought for the downstairs walls. I’m not sure how many bales the upstairs will take, but I guess about 150.

So, we have a lot to get done this next week. Today and tomorrow, Dad, Danny, and I are going to cut the winter’s supply of firewood. I’ll get back to the house at the beginning of next week.

northeast corner from outside  front of house

Thursday, September 23, 2010

Another bale wall and a video

new wall viewed from the porchexterior view

On Tuesday, I added some more bales to the kitchen walls and pinned two of the kitchen walls. I had to make some custom bales to fit at the top of the wall along the roof line.

On Wednesday, I decided to stack the wall between the mudroom and the kitchen. I needed to put the bales up above the mudroom doorway and the kitchen doorway, and I needed the rest of the wall constructed before I could do that.

The boys helped me put some plastic on the outside of the upstairs on the west side. This is so that rain cannot blow in from above and soak the bales in the downstairs wall.

As I was getting started stacking, Anne came down to the house to be my helper. Since new wall stackedthere was a lot of retying on this section of wall, there wasn’t a whole lot she could do in its construction. So, she worked filling voids on the two kitchen walls that were already pinned (the voids stuff easier once the wall is pinned into place). The boys also helped filling voids with loose straw. Anne did help me put a few bales in the wall I was constructing.

Over the doors and the window, I was going to use chicken wire to suspend the bales. board supporting bale above windowOver the two doors, there was going to be a bit of a problem attaching the wire, though. I decided to not use the wire, instead opting for a board to support the bales.

I used extra porch floor boards (rough cut beech) cut long enough so that they extend beyond the openings on each side a foot or two at least. Above the doors, these boards should be sufficiently able to hold the weight of the one bale. The window opening is wider. So, even though only one course of bales is being supported, I will brace the board in the middle to the frame work which is above (the shelf upon which the upstairs bales will sit). The boards are set back from the inside edge of the wall enough that I will be able to round the edge a little before plastering. The boards will not be visible – they will be plastered over.

I was happy with the wall. The top course of bales needed to be persuaded in order to fit it under the bale shelf. This is good. It helps keep the wall tight. If a bale is hard to get into place, a piece of cardboard put under it helps it to slide over the lower bale more easily. I’ve also found that the large mallet (persuader) I built for putting the timber frame together works well for knocking bales into place.

A friend lent me an interior scaffold. This is a great thing! It really helped when beating the top course bales into the wall. He’s also lending me two sets of exterior scaffolding which will be invaluable.

I video taped a brief tour of the house showing a few of the things we’ve done recently. I’ve shared photos of all this, but sometimes it’s nice to see it in a video.

Monday, September 20, 2010

More plaster & more bales

looking into the kitchen

Last week, we stacked the first fifty feet of straw bale wall and started the first coat of plaster. Dad and I finished the first coat of plaster on the west side by the end of the week. Today, Jon and I plastered the north side.

Our plaster recipe is five gallons of clay dirt which has been screened through 1/2” and then 1/4” hardware cloth, five gallons of sand, two gallons of chopped straw, one quart of homemade wheat paste, and about 3 gallons of water. We mix it in my electric concrete mixer. It mixes into the consistency of a chocolate mousse.

The plaster is spread on the bales by hand. We are really working it into the bales, making sure it is well keyed in. The goal at this point is a thin covering of plaster that will adhere well while revealing the topography of the bales. It takes a bit of time to work it in this way, plaster on north sidebut I want to be sure it is a good base for the next coat, one that will not come off.

We finished the first coat on the north wall by lunch time. So, after lunch we started stacking some more bales. Our approach is to build the walls in sections. Most of the walls will have to be protected from the elements until they are well plastered. So, I don’t want them all erected at once.

Our second bale wall section begins at the door from the kitchen to the summer kitchen and ends at the front door. I debated about whether or not to dip the bales in clay slip this time. It adds an additional couple of steps and slows down the stacking of the bales. We found little advantage to our dipping efforts the last time.

The idea with dipping is to have a coating of clay on the bales for the discovery coat to adhere to. We didn’t end up with that much clay on the bales, at least not enough to help with the plastering except in one or two spots. Also, trimming the face of the bales with a weedeater string trimmer makes a nicer surface for plastering than not trimming then, but it also knocks off a fair bit of the clay from the slip.

So, I decided that we will just continue working the first coat of plaster well into the bales and not worry about dipping them in clay slip. We’ll spend the extra time required in plastering rather than spend extra time in mixing clay slip and dipping bales before stacking them.

Stacking the bales around the kitchen and to the front door meant that we built a section of wall against the timber frame in one area. bale hung above window openingThere is a window opening framed in this section for a 1 foot tall by 4 feet wide window on the wall behind the wood stove. This gave me an opportunity to experience hanging bales above a window. My idea was to round the bottom inside edge of the bale and then hang it above the window with chicken wire (poultry netting). The concept worked, as you can see in the photo to the right. There are still a couple bales to be added  to the wall on either side. I’ll have several more windows above which to hang bales as we progress.

I’ll pin the bales tomorrow, trim their faces, and fill voids, if all goes well. I’d like to start plastering the outside of this wall section on Wednesday.