A video tour of the house filmed on September 7, 2012, just after we finished the 2nd coat of plaster on the downstairs walls.
A video tour of the house filmed on September 7, 2012, just after we finished the 2nd coat of plaster on the downstairs walls.
We were able to get back to plastering this last week. We spent the previous week getting the cisterns hooked up. The week before that was occupied with making hay while the weather was good for doing so.
We finished all of the straw bale walls in the downstairs by Friday, September 7, 2012. It took 28 batches to do them all. That’s nearly 3 tons more plaster on the walls once it’s all dry. So far, we’re up to 9 tons of plaster on the interior walls. That total will increase by another 3 tons by the time we’re done, I expect. I think of that as great thermal mass to help moderate the interior temperature during the year – warm in winter, cool in summer.
We hope to complete the second coat upstairs within the next two weeks.
Last summer, we buried three 1,500 gallon septic tanks (new ones) in front of the house to serve as a cistern for rain water collected off of the roof of the house. I also contracted with a local company to install 6-inch seamless gutters on the house. However, it took them a year before they came and completed the job. Thankfully, I wasn’t in a hurry. I patiently waited for them to do the job, calling them occasionally to find out when it would happen (it was almost always, “the first of next week unless the weather is bad”). Yeah, I could have hired someone else to install gutters, but the quote  I got from this company was $700 cheaper than the quote I got from another company, and it cost less than what it would cost for me to install gutters.
Anyway, they showed up in late June this summer and installed the gutters. It took me until the last part of August to finally plumb our water collection system from the downspouts to the cistern. It wasn’t difficult. 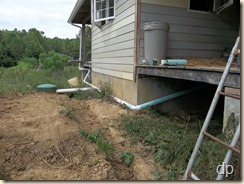 Basically, I ran 4-inch Schedule 35 sewer pipe from each of the four downspouts to the cistern. I installed a roof washer on the east side and on the west side of the house.
The roof washers purpose is to divert away from the cistern the first 100 gallons of water that come off of the roof in a rain storm. 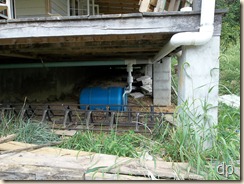 This allows dirt, bird droppings, and other contaminants that may have accumulated on the roof to be washed off with the beginning rain and not end up in our household water.
I contemplated upon how to design the roof washer system for the house. The design I settled on uses a 55-gallon barrel for each one. As water flows from the two downspouts on either side of the house, it flows into the barrel on that respective side. I used 2-inch PVC to connect to the barrel with a home-made floating ball valve in the line. 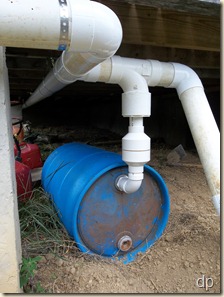 The initial rain off of the roof will not generally be more than the 2-inch pipe can handle. The water flows around a ball contained in the space inside two 4-inch to 2-inch reducers. When the barrel is full, the ball floats upward and closes off the entrance for the water into the barrel. This is to help insure that nothing in the barrel can be washed out and back into the line to the cistern.
For the floating ball valve to work, the barrel must be sealed. The water and little bit of air left in it when full keeps the ball from sinking, effectively closing the inlet to the roof washer. I laid the barrels on their side so that water flows in through the top bung into which a regular 2-inch threaded PVC connector threads (2-inch NPT). The other bung which has different threads (very course) can be opened to drain the water out of the roof washer barrel after a rain shower. 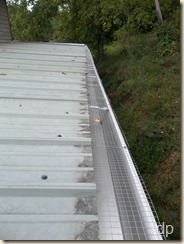 This system collects about 50 gallons on each side of the house before the water proceeds to the cistern.
We’ve had nearly 3 inches of rain during the last two weekends. I previously calculated that it would take about 2.5 inches of rain to fill the cisterns. My calculation was very close. The cistern was full and overflowing somewhere around 2.6 inches of rain. The overflow runs from the cisterns to the pond through a 100-foot section of 4-inch corrugated drain pipe.
The last thing I did to ready the system for water collection was to install 1/2-inch hardware cloth over the gutters. I bought 3-foot by 10-foot rolls of galvanized hardware cloth and cut it into 8-inch widths with a metal cutting blade. I inserted one edge two inches under the roof metal and attached it to the top of the outside edge of the gutters with self-drilling machine screws ever couple of feet. This keeps most of the leaves out of the gutters and out of the cistern. A few leaves that get through will end up in the roof washers. The rest of them are screened out before the water enters the cistern (it’s run through window screen). Before we use the water in the house, it will run through an inline screen filter, and all drinking water will be filtered with a ceramic filter or a reverse osmosis filtration system.