Introduction

The 57 acres that comprise Cedar Ridge Farm are located in the beautiful rolling hills of South Central Kentucky. My wife, our four children, and I are on a homesteading adventure as we work toward increased self-sufficiency. We grow much of our own food and enjoy being in touch with the agrarian roots of our lives.

One of the major projects we have undertaken is the building of our own home. The house we're building has three major distinguishing features: 1. we're building it without incurring any debt; 2. it is a timber frame structure; and 3. the exterior walls will be plastered straw bales. We live debt and mortgage free, and building our house with that approach makes perfect sense. Large timbers in a home possess a beauty and project a sense of strength, stability, and warmth that we want in our home. Straw bale walls provide insulation and make ecological sense. This blog is a record of our home-building project.

Saturday, October 30, 2010

More second coat of plaster & more windows

The house on 10/30/2010We had some rain early this week. I thought that might slow down work on the house, but we were able to still get things done.

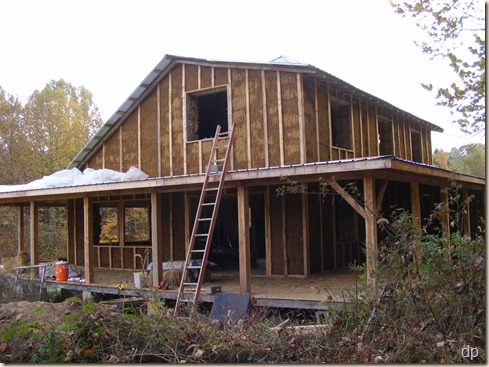
Dad and I worked on the second coat of plaster on the walls under the porch roof – the south, east, and north walls. In two days’ work, we were able to get all the way around except for two small sections above the back door which I’ll finish later. surface of 2nd coat of plaster We ran out of plaster at the end of the day, otherwise these sections would be completed, too.

Working on the second coat on the exterior, I’ve learned a few things which will help when the time comes to plaster the interior. On the inside, I want a nice, fairly smooth and even wall surface. One of the things that I’ve learned is to be sure to prep the wall adequately, filling in voids and generally making the surface to be plastered as smooth and straight as possible.

On the outside there are places in the first coat of plaster which are higher and lower than other sections. The low spots need extra plaster to fill them and the high spots require a greater thickness of plaster over the wall to achieve a smooth, flat surface. On the exterior, since it will have siding, it’s not important to completely smooth out the wall. So, we’ve not endeavored to achieve the same sort of surface which I desire for the inside.

Another lesson I’ve learned is to make sure the plaster mix only has the amount of clay that is needed. An excessive amount of clay in the plaster causes it to crack while it dries since clay shrinks as it dries. front living room windowsIt is amazing how hard the plaster gets when it dries even when it is mixed with only 28% to 30% clay content.

Since we pretty much finished the second coat of plaster downstairs, we went ahead and installed some windows and doors yesterday. We put in the front door, the back door, the living room windows, the master bedroom window, and the two bathroom windows. These went in very well, the biggest time consuming part being cleaning the almost five years of accumulated dust and dirt off of large windows.

east wall of windowswindows and door on back of house

We were going to install the small windows that will go above the wood stove, but it has one pane of glass that is cracked which allowed some dirt to get between the panes. We’ve taken the window apart, and I will install a new pane of glass and clean the inside surface of the other pane. Then, I’ll be able to put this window in.

We also didn’t install the large sliding glass door that goes in Anne’s and my bedroom. We’ll do that later. There’s no rush.

We ought to be able to plaster the exterior upstairs walls early this coming week. I’m expecting a few people to come over tomorrow to help with the second coat. Once we have it completed, I’ll install the upstairs windows, at which time they will all be in. Then, there are a few small tasks to complete before starting on the siding.

Inside the living room

Saturday, October 23, 2010

Windows, the first ones installed

the house

Every step of the process is exciting as we watch the house come together. I’ve devoted a lot of time so far this year working on the house, and there are a lot of hours of work yet to come. It’s a long, arduous process, but we are getting there little by little.

Yesterday, we had another milestone on the project as we began installing windows and doors. Previously this week, we put the second coat of plaster on about 100 feet of wall. One of the casement windowsThis brought us to the point of being able to put in some windows and doors in preparation for siding these walls.

It was a little over four and half years ago that I purchased 15 large casement windows off of Ebay and traveled to Flushing, Michigan, to pick them up. They’ve been stored in the barn since then. Dad and I brought five of them to the house yesterday to clean off the accumulated dust and dirt and to begin setting them into the openings for them on window from the insidethe house.

I am very pleased with the quality of these windows. They are well made, opening, closing, and locking very nicely. They are also beautiful. They lend a certain elegance to the house, I think. Anne is also pleased with them.

As casement windows, they crank open. There are two 27” windows on each unit. When opened, unlike double-hung windows which only open half (at the most) of the window, these windows open the entire area, providing great ventilation. We are going to really appreciate them.

the kitchen windows -- to be replacedWe also put in the kitchen windows, but I’m going to take them back out. They just are not of a good enough quality. Additionally, since they are double-hung, it will be difficult to open and close them, because it will require reaching over 24” of counter and 18” of window sill. Not an easy thing to do. So, I’m going to get some casement windows for the kitchen, too. Hopefully, I will be able to find some whose quality will be acceptable. The others will be saved for a later building project.

The windows certainly change the look of the house.

We also installed two doors. On Thursday, I purchased two more exterior doors which I needed. I got them from the local guy who had just gotten a trailer load of doors and windows, among which mudroom door and dining area windowwere the two 15-light 36” exterior doors I wanted. We put in one of these yesterday and another full-light door I purchased previously.

One of the doors presented a challenge because it was 1/2 inch taller than standard, meaning the opening I framed was not high enough. We were able to make some modifications which allowed the door to fit in the opening.

We’re all excited and look forward to continued progress on the house.

Thursday, October 21, 2010

Beginning the second exterior coat of plaster

The plaster that was applied on the day of the mud party is drying nicely. It looks like the upstairs walls will be dry by this weekend while the walls under the porch roof will take a few days longer. They don’t get the same air and sunlight, of course.

Danny and I started applying the second coat on Tuesday to some of the walls which we’d previously plastered with the first coat. The walls from the sewing room/study around the laundry room and mudroom all the way to the kitchen had a dry first coat of plaster. It was easiest to start on the porch area on the west side of the house.

Even though we didn’t get an early start and took some extra time in the middle of the day for a couple of errands, we were able to complete all of the wall area on this side of the lower walls with 2nd coat of plaster appliedporch and begin on the other side of the kitchen.

One of the reasons that I selected this wall to start with is because it is protected by the porch roof. I wasn’t sure about the mix ratios for the plaster, and we still needed to figure out how to best apply it.  If there are cracks in the plaster here or application problems, they are less likely to cause any problems than if they were elsewhere.

west wallYesterday, Dad and Jon joined Danny and I in plastering around the rest of the walls that had dry first coat plaster.    We were able to get the second coat on all of these areas except for three very small areas on the kitchen walls (there wasn’t enough in the last batch of plaster). I’ll complete these today or tomorrow.

I ended up mixing five gallons of clay with ten gallons of sand, a quart of wheat paste, a gallon of chopped straw, and about north wallfour gallons of water (we chopped the straw with a mulching lawn mower). The application procedure involved wetting the surface of the previous coat of plaster (we used a garden sprayer), smearing plaster on the wall by hand, getting plenty in the corners, edges, and deep spots, and then using a trowel to smooth it out and add more plaster as needed.

The ideal is to have a flat, even surface. However, we didn’t pursue that ideal. The operating goal we had was to get a good coat of plaster over the first coat, smoothing out the depressions and ridges as best we could. second coat of plaster surfaceWe didn’t worry about a smooth, flat surface as much as increasing the overall thickness of the plaster on the wall, filling voids/depressions, generally smoothing out undulations in the wall, and sealing up cracks on the first coat. The resulting surface still has undulations, less than what was there before, though. Since it will be covered with siding, it’s not necessary for it to be perfectly smooth and flat.

As the plaster dries, I will be able to observe the number and types of cracks that appear in the surface. They aren’t critical at this point, and I may or may not do something to seal them, depending on their location and size. The siding’s job is to provide a layer of protection for the plaster and bales, keeping rain and other moisture off. If it does it’s job as expected, some small cracks in the exterior wall surface will not be an issue.

kitchen wall

I’ll see how the plaster dries today and tomorrow. My thought for Friday is to put windows in on the walls that have the second coat of plaster. The windows which have been stored in the barn for some time will need to be cleaned first. With windows in and the second coat of plaster, the bales ought to be protected well enough from all by a driving rain. I may cover them with plastic anyway until I get a chance to put the siding on. I’ll definitely cover the upstairs walls with plastic before the weekend (maybe we’ll get rain).

Monday, October 18, 2010

The first coat of plaster is complete

workers during the mud party

Yesterday we had a very successful work party. The goal was to get the rest of the first coat of plaster on the exterior of the bale walls. In order to help us reach that goal, several friends showed up to get their hands dirty. working on the downstairs north wallWe had 41 people here, counting the children and adults. There were between 13 and 17 individuals working on the plaster during the day.

It was an enjoyable and profitable time. The volunteers worked diligently throughout the day. We did stop for lunch which was quite a feast. One individual commented that it was worth coming just for the lunch!

Work upstairsI told everyone that people actually pay hundreds of dollar to participate in a plaster workshop similar to what we were doing. I didn’t want to host a workshop, though. I wanted friends, not strangers, helping on the house.

We got a lot done. The plasterers kept me busy at the mixer mixing batch after batch just to keep up with them. By the end of the day, almost all of the wall surfaces were plastered. There were only a few small sections at the top of the wall upstairs that still needed some plaster.  I was very pleased.

This morning, I went over all of the surfaces that were plastered yesterday, checking for soft spots that needed pressed into the bales or places that needed more mud. Overall, the job done was excellent! There were very few places that needed my attention.

I then mixed up a batch of plaster to finish the sections that were not completed. There were a few places on the front wall of the kitchen that were not finished a week ago. I didn’t intend for that to be done yesterday. So, I finished it today. Then, I went upstairs on the porch roof and finished the small sections near the roof line.

So now, the entire first coat is complete. The plaster is drying nicely. The weather has been very good for drying. Although we could use some rain, for the sake of getting the outside plastering done in order to close up the house before cold weather, the weather couldn’t be better.

Here are some photos of the newly completed walls:

downstairs north wall downstairs east wall downstairs south (front) wall upstairs east wall upstairs west wall upstairs north (back) wall

I intend to start in earnest on the second coat of the straw bales tomorrow. I will have to play with the mixture to find the right sand-clay ratio and proper wetness so that it will trowel on smoothly.

Friday, October 15, 2010

Video of the upstairs with the bales stacked

I took some video yesterday showing the bale walls in the house, primarily upstairs since that is what we’ve most recently finished.

Tuesday, October 12, 2010

Upstairs bale walls

Today, I didn’t work much on the house. I put some plastic up to protect the bales that were exposed. Just as I was finishing, it began to sprinkle. It didn’t amount to much, but it was good to get them covered. Tomorrow, I hope we can get all of the walls pinned. The idea is to have them ready to be plastered during the mud party on Sunday.

I took a few photos of what we accomplished yesterday so that I could share them. It’s really neat to see the house with the walls stacked.

northwest corner

The stairs will come up near where the ladder is in the next photo. There is a small landing at the top of the stairs between the two upstairs bedrooms. We’re planning a cozy, little reading area by the window on the landing. 

Looking across to the west bedroom, there will be a wall between the two posts making a storage area under the eaves. There will also be a wall on the near side of the room where the ladder is leaning.

Looking toward the east bedroom, you can see that the windows on the back of the house are set quite low. They are one bale height above the floor which will make them really cozy with the built in window seat. There will be closets on either side of the back window in each bedroom, making the window feel more like a dormer.

The west window in the west bedroom. All of the large windows in the house, like this one, will have wood sills making comfortable window seats. You can imagine how nice it would be to sit in the window with a good book on a sunny winter day.

Monday, October 11, 2010

Straw bale observations

We stacked the walls upstairs today. Sorry, no photos, because I was busy working. I ought to be able to post some tomorrow, though.

Yesterday, Dad and I brought 136 bales from the barn to the house. When I stopped to think about it, I realized that those bales have been stored in the middle of my barn for over four years. I bought them in the summer of 2006 in anticipation of needing them by August that year (I was overly optimistic, in case you didn’t know).

I’d forgotten what these bales were really like. The man I bought them from grew rye just for straw. He cut it when it had good straw but before it had any grain. I’d forgotten, but he told me that when they baled it, they raked it into large windrows so that it would make large, heavy bales. They are indeed large and heavy, very dense.

One of the things you read about selecting bales for a straw bale home is to be sure to get tight bales. I will tell you that this is good advice. The bales I bought this year are not as tightly and densely baled as the ones I bought four years ago, and it does make a difference in handling them and stacking them into the wall. The tighter, denser bales, although heavier, are easier to work with. You can move them, shove them, kick them, beat them, and generally force them into the spaces where you want them.

For our house, it was really good that we used these tighter bales upstairs. The first course had to be stomped into a tight space between the porch roof and the beams of the timber frame. the top courses had to be coaxed into some hard to get to spaces. These bales held onto their shape and went into some tough places.

The other bales are fine, less you think they aren’t. I just wanted to share my observation about the tightness of the bales. The tighter and denser they are, the better they are for building with.

One other observation from digging into the pile of four year old bales is that they were in great shape. There were several on the top layer that were no good because they’d gotten water onto them (there are a few spots where the roof sometimes leaks a little). I also had a tarp over the top of the pile for the first year or two which held in some moisture that got under the bales – this caused some to mold on top.

However, inside the pile, the bales were tight and in good shape. I figure if these bales can survive in a pile in the barn with the humidity we experience here, they will fair well as walls encased in clay.

On another subject, preparation for the mud party on the 17th is going well. We have several families planning on attending.

Thursday, October 7, 2010

More progress and a work party (ya’ll come)

We are keeping at it and making progress!

I decided to invite friends and acquaintances over for a work party on October 17, 2010. If you’re interested, let me know.

The plan for the work party day is to get as much mud on the bales as possible. In preparation, I’m planning on getting all the bales stacked, one of the living room windowspinned, and ready for plastering before October 17.

Yesterday, we stacked the rest of the bales downstairs (well, except for one above a door). There weren’t a great number of bales because of the many window openings, but it required a bit of retying which takes time. Also, the last course downstairs must be wedged in between the previous course and the bale plate which requires a little effort and some persuasion with the large mallet.

back wallnortheast corner

While Dad and I stacked bales, Danny and Jon plastered the kitchen walls. plaster on front kitchen wallThey did have some help from my younguns for a while. They weren’t able to finish the front wall, but they got a good start.

I’ll be sorting out good bales from those stored in the barn for the upstairs walls. So far we’ve used about 280 of the 300 bales I bought for the downstairs walls. I’m not sure how many bales the upstairs will take, but I guess about 150.

So, we have a lot to get done this next week. Today and tomorrow, Dad, Danny, and I are going to cut the winter’s supply of firewood. I’ll get back to the house at the beginning of next week.

northeast corner from outside  front of house

Monday, October 4, 2010

More plastering

After taking last week off from work on the house, I got back into it yesterday and today. On the agenda was more mud work.

A week and a half ago, my boys and I examined a possible source for clay on our property. The sample we collected looked promising, but I wasn’t convinced that it was what we needed or wanted. It certainly pile of dirtwasn’t as sticky and nice as what we’ve been working with. Then, we checked out another source that seemed more promising.

I spent a little time on Sunday morning excavating a bit of this soil which I deposited near the house. I was anxious to see how it would do. So, I screened a little and mixed up a batch of plaster. test patchI put it on a small section of one of the kitchen bale walls. I’ll test it after it’s fully dried. It’s a different color than what I’ve been working with and seemed to have less clay content. We’ll see.

After applying the test patch, I screened some wet clay I had in a bucket. Before taking off last week, I put some of the dirt we discarded after screening into a bucket and added water to let it rehydrate. 2nd coat of plaster below windowA lot of this material was little balls of clay that didn’t break up to go through the screen. Since it was well-hydrated, I worked it through the screen into the wheel barrow.

I mixed it with some sand and chopped straw and some wheat paste to make a small batch of plaster. I mixed it with a greater proportion of sand than the previous plasters and thicker. My intention was to apply the second coat on part of an already plastered wall. I wanted to try out the mix and see how it went on. I put it under the mudroom window, troweling it smooth. It went on nicely and looks good as it is drying.

newly plastered wallmore newly plastered wallToday, I started by pinning the wall along the eating area on the west side of the house. Danny and Jon joined me after I had started and worked with me. Danny filled voids while Jon helped with the pinning. We were able to apply two batches of plaster to the wall before lunch. After lunch, we screened some more dirt and did some more plastering. By the time we quit, there were only a couple small areas left without plaster.

plastered walls and plastic