Introduction

The 57 acres that comprise Cedar Ridge Farm are located in the beautiful rolling hills of South Central Kentucky. My wife, our four children, and I are on a homesteading adventure as we work toward increased self-sufficiency. We grow much of our own food and enjoy being in touch with the agrarian roots of our lives.

One of the major projects we have undertaken is the building of our own home. The house we're building has three major distinguishing features: 1. we're building it without incurring any debt; 2. it is a timber frame structure; and 3. the exterior walls will be plastered straw bales. We live debt and mortgage free, and building our house with that approach makes perfect sense. Large timbers in a home possess a beauty and project a sense of strength, stability, and warmth that we want in our home. Straw bale walls provide insulation and make ecological sense. This blog is a record of our home-building project.

Friday, December 24, 2010

I worked on the house a little today

It’s been a while since I posted. At least one person let me know that he’s experienced withdrawal symptoms because of the lack of updates!

We spent Thanksgiving in North Carolina with family. It was a good visit. Once we got back home, I focused some time on getting my classes taken care of. I teach a Social Foundations of Education course online for a university. I’m redesigning my class for the Spring semester which requires some time and attention. I also had to finish up this semester’s class.

The result has been that I’ve not spent time working on the house. There are, of course, plenty of things to work on, I’ve just focused my time and efforts elsewhere.

This morning I decided that I would see about putting up an interior wall, though. It felt good to actually get back to work on the house.

I laid out the location for one wall of the pantry and took measurements. Malchiah helped me get materials ready and put the wall together. 003It went smoothly. We built the wall on the floor and then raised it into place.

The pantry will be 64 inches wide inside with shelves at least 15 inches deep around three sides. There will be several rows of shelves, exactly how many I don’t know yet. We ought to have plenty of room for storing all of our canned goods and some other food supplies.

I also want to put a trap door in the floor to allow access to the crawl space from inside the house. The crawl space might be a good place to store vegetables that like cool (but not cold) and dry conditions.

After I get some more 2x4s, I’ll build the other wall of the pantry and other interior walls. I also have stairs to construct, window sills to install, electrical, and plumbing installation, etc. As I said, there plenty to do. I’ll endeavor to keep you updated on my efforts.

Sunday, November 21, 2010

Quick update

Having gotten the siding on the house, I was able to spend time in the woods last week. Rifle season was open here from last weekend through this one. We love venison. So, I wasn’t working on the house; 003I was out trying to harvest some meat for the family.

My dad and Danny also hunt here. We got three deer last Sunday and none since. We processed the meat – canning and freezing. We would like more, but we’re thankful for what we were blessed with. I’ll spend some more time out during our week of muzzleloader season in December.

Anne and the children and I are going to spend Thanksgiving with family in North Carolina. So, it’ll be December before I get back to work on the house. I have a lot I want to get done this winter. So, I’ll need to stay busy with it.

I’ll post more once I get back to work on the house.

Saturday, November 13, 2010

Two new videos of the construction process

I’ve put together two new videos. Actually, they’re slide shows of photos taken during the construction of our house. Part One starts with the raw timbers in February 2005 and concludes in February 2010. A lot was accomplished during that time even though it wasn’t as much as I had hoped for.

Part Two shows the progress we’ve made this summer and fall. I couldn’t be happier with what we’ve gotten accomplished just since late May.

I wanted to put these photos together in this way to see a synopsis of my work. I’ve been focused on each day and each task. So, it’s nice to sort of step back and see what we’ve been working on come together.

Here they are. Enjoy and, please, leave a comment (I love hearing from ya’ll)!

Part One:


Part Two:

Friday, November 12, 2010

The siding is complete

front of houseWith the blessing of good weather this week, we were able to get the siding all installed. We first completed the walls around the mudroom, laundry room, and sewing room and then began on the walls on the porch on the west side of the house. The process went very smoothly, and we were able to finish Thursday afternoon.

The siding has several different colors, but we’ll be painting it next summer when the weather warms up. There were about 7 different colors in all. I think some of the material was leftover from other projects that was returned to the building supply company. I bought it from a local guy who bought it in auction from the supplier. So, I got a really good deal on it.

northwest cornerfrom a distance

I still have to caulk around the windows and corners, but other than that the house is closed in now. It’s been my goal to have it closed in before Thanksgiving. It’s really quite exciting to meet that goal. I feel very blessed.

Sunday, November 7, 2010

The 2nd floor siding is complete

looking at the house through the trees on the hillside

We were able to finish the siding on the upstairs walls by lunch time today. We were careful throughout the installation process to waste as little material as possible. When I bought it, I quickly calculated that there was enough on this one pallet to do the upstairs walls, but there wasn’t going to be much extra. Apart from scraps of around 12 inches or less, we had four 4-foot sections left over. There were also about two full pieces that were not usable because they were de-laminated.

I think it turned out fine. I’ll clean it sometime later, and I plan on painting it some time. For the time being, it will be fine since it is pre-painted. My plans to paint it are based on the fact that there isn’t enough of one color to do the whole house, and I don’t really want five different colors as a permanent thing.

After we finished the siding, Dad and Danny swept the porch roof off, and we took down the scaffolding and plastic. Since it was all tidied up, it was a good opportunity to take a few photos.

005006004012

Friday, November 5, 2010

Beginning the siding

Before too long, we ought to be able to get the plastic off of the house.

I spent some time on Tuesday fixing the small window that goes above the wood stove. It had a crack in one pane which had allowed some moisture to get between the panes and leave some water deposits. I wasn’t able to purchase I piece of glass locally large enough to replace the one pane, but I had some window glass that was of sufficient size if I could cut it. So, I read about cutting glass and watched a few videos online.

Thankfully, I had more than one piece of glass to work with. I practiced on one and then attempted to cut the real thing. The first one turned out acceptable, although there were a few rough edges. So, I cut another one that turned out a little better. When fixing the window, I ended up using both of the ones that I cut since I couldn’t clean the one remaining pane in the window.

Anyway, it took me most of the morning to get the window repaired and put in the wall.

After finishing the window, I started putting on the flashing where the upstairs walls meet the porch roof. I previously bought a couple rolls of 24” aluminum flashing for this purpose. One of the rolls was long enough to reach from one corner to the other across the back of the house. The other roll was long enough for both ends except for about 5 feet. I had to use some other flashing material there.

On Wednesday, it rained all day. It was just a light, drizzly kind of rain. I put up the tarp on the back of the house upstairs because when the water dripped off of the upper roof, it was splattering on the wall. Since there was no wind with the rain, the other upstairs walls didn’t get wet.

Yesterday, I finished the flashing on one side and started installing the siding. I attached the first piece by myself and then realized that I would need some help to do the rest of them. Twelve foot pieces of Hardiplank siding are west endsomewhat unwieldy. Thankfully, my dad was available to help me in the afternoon.

We worked on the west wall and were able to get the siding to above the window. There was a fair bit of cutting involved to match the roof line and to fit around the window. Also, since I hadn’t initially planned on using this type of siding, I didn’t have the vertical stringers optimally spaced for installing it. That means that there is a little more waste at times in order to make sure that the ends are on one of the stringers so they can be nailed securely.

This morning, even though it was chilly and spit a little bit of rain at times, we were able to get the east wall up to the same height as the west wall. back wallAfter lunch, we worked on the back wall. We didn’t finish it, but we got a good start and should be able to finish it and the other two walls on Sunday.

When I bought the siding, one bundle, enough to do the upstairs based upon my hasty calculations, was a 6 inch exposure while the rest was a 7 inch exposure. I figured that this would work well. If I don’t have enough to finish all of the upstairs walls with the 6 inch, I can finish it off with some of the 7 inch near the top. We didn’t continue above the windows on the either end to ensure we had enough to get the siding up most or all of the way on the back.

Monday, November 1, 2010

Upstairs plaster and windows

We had a few friends make it yesterday to help with the second coat of plaster. The objective for the day, which we achieved, was to finish the second story walls. We had six people applying plaster and two more mixing and delivering the plaster to the other workers. Everything went very smoothly, and I am very pleased. I can’t express how grateful I am to all of the wonderful people who have given of their labor to help out on our house project.

There is only one small section on the front kitchen wall that still needs the second coat of plaster, maybe four square feet. I should be able to apply that tomorrow.

After we finished the plastering yesterday, I recruited some help to move the sliding glass door from the barn to the house. It’s been stored in the barn for the last three years. It’s an eight foot wide door, and it’s quite heavy. windows and door on east side of houseSo, it was really nice to have some help moving it. I’m not sure that Dad, Danny, and I could have moved it successfully by ourselves.

This morning after I went into town to run a few errands, Dad and I set it in place in the house.  It’s on the east side of the house leading from what will be the master bedroom onto the porch. Thankfully, the door fit in the framed opening with little difficulty. We spent a little time cleaning it after installing it.

After lunch, Danny helped us move the remaining five windows from the barn, clean them, and install them upstairs. Cleaning the nearly five years of accumulated dirt off of the windows took longer than it did to carry them up ladders and install them.

upstairs windows on back of house west side

So, we now have all of the windows and doors put in except for the small windows that will be above the wood cook stove – I have to cut and put in a new piece of glass. Hopefully, I can do that tomorrow. We also will swap out the kitchen windows with new casement windows when they arrive, which should be by this coming weekend.

We should be able to start installing siding this week. It looks like we’re on schedule to have the house closed in by the end of next week. That’s my goal, anyway.

Saturday, October 30, 2010

More second coat of plaster & more windows

The house on 10/30/2010We had some rain early this week. I thought that might slow down work on the house, but we were able to still get things done.

Dad and I worked on the second coat of plaster on the walls under the porch roof – the south, east, and north walls. In two days’ work, we were able to get all the way around except for two small sections above the back door which I’ll finish later. surface of 2nd coat of plaster We ran out of plaster at the end of the day, otherwise these sections would be completed, too.

Working on the second coat on the exterior, I’ve learned a few things which will help when the time comes to plaster the interior. On the inside, I want a nice, fairly smooth and even wall surface. One of the things that I’ve learned is to be sure to prep the wall adequately, filling in voids and generally making the surface to be plastered as smooth and straight as possible.

On the outside there are places in the first coat of plaster which are higher and lower than other sections. The low spots need extra plaster to fill them and the high spots require a greater thickness of plaster over the wall to achieve a smooth, flat surface. On the exterior, since it will have siding, it’s not important to completely smooth out the wall. So, we’ve not endeavored to achieve the same sort of surface which I desire for the inside.

Another lesson I’ve learned is to make sure the plaster mix only has the amount of clay that is needed. An excessive amount of clay in the plaster causes it to crack while it dries since clay shrinks as it dries. front living room windowsIt is amazing how hard the plaster gets when it dries even when it is mixed with only 28% to 30% clay content.

Since we pretty much finished the second coat of plaster downstairs, we went ahead and installed some windows and doors yesterday. We put in the front door, the back door, the living room windows, the master bedroom window, and the two bathroom windows. These went in very well, the biggest time consuming part being cleaning the almost five years of accumulated dust and dirt off of large windows.

east wall of windowswindows and door on back of house

We were going to install the small windows that will go above the wood stove, but it has one pane of glass that is cracked which allowed some dirt to get between the panes. We’ve taken the window apart, and I will install a new pane of glass and clean the inside surface of the other pane. Then, I’ll be able to put this window in.

We also didn’t install the large sliding glass door that goes in Anne’s and my bedroom. We’ll do that later. There’s no rush.

We ought to be able to plaster the exterior upstairs walls early this coming week. I’m expecting a few people to come over tomorrow to help with the second coat. Once we have it completed, I’ll install the upstairs windows, at which time they will all be in. Then, there are a few small tasks to complete before starting on the siding.

Inside the living room

Saturday, October 23, 2010

Windows, the first ones installed

the house

Every step of the process is exciting as we watch the house come together. I’ve devoted a lot of time so far this year working on the house, and there are a lot of hours of work yet to come. It’s a long, arduous process, but we are getting there little by little.

Yesterday, we had another milestone on the project as we began installing windows and doors. Previously this week, we put the second coat of plaster on about 100 feet of wall. One of the casement windowsThis brought us to the point of being able to put in some windows and doors in preparation for siding these walls.

It was a little over four and half years ago that I purchased 15 large casement windows off of Ebay and traveled to Flushing, Michigan, to pick them up. They’ve been stored in the barn since then. Dad and I brought five of them to the house yesterday to clean off the accumulated dust and dirt and to begin setting them into the openings for them on window from the insidethe house.

I am very pleased with the quality of these windows. They are well made, opening, closing, and locking very nicely. They are also beautiful. They lend a certain elegance to the house, I think. Anne is also pleased with them.

As casement windows, they crank open. There are two 27” windows on each unit. When opened, unlike double-hung windows which only open half (at the most) of the window, these windows open the entire area, providing great ventilation. We are going to really appreciate them.

the kitchen windows -- to be replacedWe also put in the kitchen windows, but I’m going to take them back out. They just are not of a good enough quality. Additionally, since they are double-hung, it will be difficult to open and close them, because it will require reaching over 24” of counter and 18” of window sill. Not an easy thing to do. So, I’m going to get some casement windows for the kitchen, too. Hopefully, I will be able to find some whose quality will be acceptable. The others will be saved for a later building project.

The windows certainly change the look of the house.

We also installed two doors. On Thursday, I purchased two more exterior doors which I needed. I got them from the local guy who had just gotten a trailer load of doors and windows, among which mudroom door and dining area windowwere the two 15-light 36” exterior doors I wanted. We put in one of these yesterday and another full-light door I purchased previously.

One of the doors presented a challenge because it was 1/2 inch taller than standard, meaning the opening I framed was not high enough. We were able to make some modifications which allowed the door to fit in the opening.

We’re all excited and look forward to continued progress on the house.

Thursday, October 21, 2010

Beginning the second exterior coat of plaster

The plaster that was applied on the day of the mud party is drying nicely. It looks like the upstairs walls will be dry by this weekend while the walls under the porch roof will take a few days longer. They don’t get the same air and sunlight, of course.

Danny and I started applying the second coat on Tuesday to some of the walls which we’d previously plastered with the first coat. The walls from the sewing room/study around the laundry room and mudroom all the way to the kitchen had a dry first coat of plaster. It was easiest to start on the porch area on the west side of the house.

Even though we didn’t get an early start and took some extra time in the middle of the day for a couple of errands, we were able to complete all of the wall area on this side of the lower walls with 2nd coat of plaster appliedporch and begin on the other side of the kitchen.

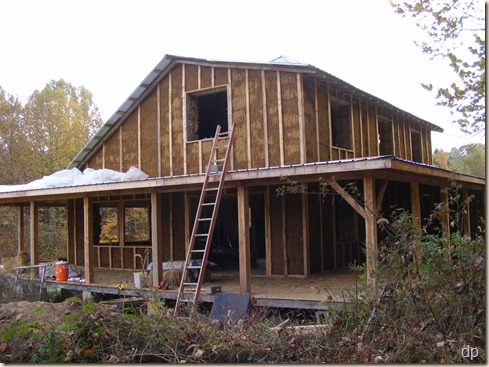
One of the reasons that I selected this wall to start with is because it is protected by the porch roof. I wasn’t sure about the mix ratios for the plaster, and we still needed to figure out how to best apply it.  If there are cracks in the plaster here or application problems, they are less likely to cause any problems than if they were elsewhere.

west wallYesterday, Dad and Jon joined Danny and I in plastering around the rest of the walls that had dry first coat plaster.    We were able to get the second coat on all of these areas except for three very small areas on the kitchen walls (there wasn’t enough in the last batch of plaster). I’ll complete these today or tomorrow.

I ended up mixing five gallons of clay with ten gallons of sand, a quart of wheat paste, a gallon of chopped straw, and about north wallfour gallons of water (we chopped the straw with a mulching lawn mower). The application procedure involved wetting the surface of the previous coat of plaster (we used a garden sprayer), smearing plaster on the wall by hand, getting plenty in the corners, edges, and deep spots, and then using a trowel to smooth it out and add more plaster as needed.

The ideal is to have a flat, even surface. However, we didn’t pursue that ideal. The operating goal we had was to get a good coat of plaster over the first coat, smoothing out the depressions and ridges as best we could. second coat of plaster surfaceWe didn’t worry about a smooth, flat surface as much as increasing the overall thickness of the plaster on the wall, filling voids/depressions, generally smoothing out undulations in the wall, and sealing up cracks on the first coat. The resulting surface still has undulations, less than what was there before, though. Since it will be covered with siding, it’s not necessary for it to be perfectly smooth and flat.

As the plaster dries, I will be able to observe the number and types of cracks that appear in the surface. They aren’t critical at this point, and I may or may not do something to seal them, depending on their location and size. The siding’s job is to provide a layer of protection for the plaster and bales, keeping rain and other moisture off. If it does it’s job as expected, some small cracks in the exterior wall surface will not be an issue.

kitchen wall

I’ll see how the plaster dries today and tomorrow. My thought for Friday is to put windows in on the walls that have the second coat of plaster. The windows which have been stored in the barn for some time will need to be cleaned first. With windows in and the second coat of plaster, the bales ought to be protected well enough from all by a driving rain. I may cover them with plastic anyway until I get a chance to put the siding on. I’ll definitely cover the upstairs walls with plastic before the weekend (maybe we’ll get rain).

Monday, October 18, 2010

The first coat of plaster is complete

workers during the mud party

Yesterday we had a very successful work party. The goal was to get the rest of the first coat of plaster on the exterior of the bale walls. In order to help us reach that goal, several friends showed up to get their hands dirty. working on the downstairs north wallWe had 41 people here, counting the children and adults. There were between 13 and 17 individuals working on the plaster during the day.

It was an enjoyable and profitable time. The volunteers worked diligently throughout the day. We did stop for lunch which was quite a feast. One individual commented that it was worth coming just for the lunch!

Work upstairsI told everyone that people actually pay hundreds of dollar to participate in a plaster workshop similar to what we were doing. I didn’t want to host a workshop, though. I wanted friends, not strangers, helping on the house.

We got a lot done. The plasterers kept me busy at the mixer mixing batch after batch just to keep up with them. By the end of the day, almost all of the wall surfaces were plastered. There were only a few small sections at the top of the wall upstairs that still needed some plaster.  I was very pleased.

This morning, I went over all of the surfaces that were plastered yesterday, checking for soft spots that needed pressed into the bales or places that needed more mud. Overall, the job done was excellent! There were very few places that needed my attention.

I then mixed up a batch of plaster to finish the sections that were not completed. There were a few places on the front wall of the kitchen that were not finished a week ago. I didn’t intend for that to be done yesterday. So, I finished it today. Then, I went upstairs on the porch roof and finished the small sections near the roof line.

So now, the entire first coat is complete. The plaster is drying nicely. The weather has been very good for drying. Although we could use some rain, for the sake of getting the outside plastering done in order to close up the house before cold weather, the weather couldn’t be better.

Here are some photos of the newly completed walls:

downstairs north wall downstairs east wall downstairs south (front) wall upstairs east wall upstairs west wall upstairs north (back) wall

I intend to start in earnest on the second coat of the straw bales tomorrow. I will have to play with the mixture to find the right sand-clay ratio and proper wetness so that it will trowel on smoothly.

Friday, October 15, 2010

Video of the upstairs with the bales stacked

I took some video yesterday showing the bale walls in the house, primarily upstairs since that is what we’ve most recently finished.

Tuesday, October 12, 2010

Upstairs bale walls

Today, I didn’t work much on the house. I put some plastic up to protect the bales that were exposed. Just as I was finishing, it began to sprinkle. It didn’t amount to much, but it was good to get them covered. Tomorrow, I hope we can get all of the walls pinned. The idea is to have them ready to be plastered during the mud party on Sunday.

I took a few photos of what we accomplished yesterday so that I could share them. It’s really neat to see the house with the walls stacked.

northwest corner

The stairs will come up near where the ladder is in the next photo. There is a small landing at the top of the stairs between the two upstairs bedrooms. We’re planning a cozy, little reading area by the window on the landing. 

Looking across to the west bedroom, there will be a wall between the two posts making a storage area under the eaves. There will also be a wall on the near side of the room where the ladder is leaning.

Looking toward the east bedroom, you can see that the windows on the back of the house are set quite low. They are one bale height above the floor which will make them really cozy with the built in window seat. There will be closets on either side of the back window in each bedroom, making the window feel more like a dormer.

The west window in the west bedroom. All of the large windows in the house, like this one, will have wood sills making comfortable window seats. You can imagine how nice it would be to sit in the window with a good book on a sunny winter day.