Introduction

The 57 acres that comprise Cedar Ridge Farm are located in the beautiful rolling hills of South Central Kentucky. My wife, our four children, and I are on a homesteading adventure as we work toward increased self-sufficiency. We grow much of our own food and enjoy being in touch with the agrarian roots of our lives.

One of the major projects we have undertaken is the building of our own home. The house we're building has three major distinguishing features: 1. we're building it without incurring any debt; 2. it is a timber frame structure; and 3. the exterior walls will be plastered straw bales. We live debt and mortgage free, and building our house with that approach makes perfect sense. Large timbers in a home possess a beauty and project a sense of strength, stability, and warmth that we want in our home. Straw bale walls provide insulation and make ecological sense. This blog is a record of our home-building project.

Tuesday, September 11, 2007

Newspaper ariticle about the frame raising

We made it onto the front page of Sunday's edition (9/9/07) of the local newspaper:


The article was written by Shirley Mayrand. She's been waiting to write about our house project since I told her about it shortly after meeting her three years ago. It was a nice article. If you are visiting my blog because you read about it in the paper, leave a comment to let me know!

Sunday, September 9, 2007

Some photos of the frame


Purlins and floor joists

My goal for last week was to complete the frame by the weekend. So, after all of the great help on Sunday and Monday, there were two major things to complete: purlins and first-floor floor joists. We had already put in the second-floor floor joists because we needed them to put down a temporary floor for assembling the rafter sets. Mark and I had spent a few days cutting one end on each of the floor joists and the purlins. Once the frame was raised, we only had to measure for each one and cut the other end.

After squaring and leveling the frame on Wednesday (we did some other work on Tuesday), we made sure the rafters and upstairs posts were plumb. We used 2x6s to brace them in place, and then we measured for the purlins to go in bay one (the west side of the house). My dad, Mark the intern, and I set up an assembly line to cut the ends of the purlins. Once they were cut, Mark and I hefted them up and put them in their mortises. Dad stayed on the ground to hook the purlins on the ropes we used to lift them up the second floor level.

Once we completed the purlins in the first bay, we moved to bay three at the east end of the house. The procedure remained the same. Lifting with the ropes worked well. We didn't have a lot of room at the edge of the frame, but there was enough to set them down, unhook the rope, and then set them in place.


Here's how the frame looked with the purlins in bays one and three:

On Thursday morning, Dad, Mark, and I began on the middle bay purlins. We measured their needed lengths and cut the dove tail tenons and curves on the ends.
Inserting them into their mortises was a much more nerve-wracking job than the other two bays. There is no second floor in the middle bay. So, we had to work from the outside edges on top of the other purlins. We took an hour and a half to just put these 13 purlins in.

Mark and Dad began cutting the floor joists for the the first floor in bay one while I climbed drove wedges into the dovetail joints on the purlins. We purposely cut the dovetail tenons smaller than the mortises. This allowed us to use wedges driven in on the sides of the tenons to draw the joists and purlins tight. It worked well.

By the end of Thursday, we had all of the purlins in and wedged and the first-floor floor joists in bay one. Friday morning we started with the floor joists for bay two (the middle bay). We completed these and the joists for bay three before lunch. Then, while Dad and Mark drove wedges in to tighten up the first-floor joists, I drove pegs through the knee braces that we hadn't previously pegged. So, by lunch time on Friday, September 7, 2007, the frame was completely assembled and pegged!

After taking a few pictures, we put a tarp over the frame on Friday afternoon, in order to keep some of the rain that we hope to receive off of the frame (it's been very dry here, with no appreciable rainfall for the last six weeks).

Squaring and leveling

After raising the frame on Labor Day weekend, the first thing to do was to make sure the frame was square and level. In order to square it, I had to move one bent forward a few inches, another bent toward the back an inch or two, and move the center line of the house toward the west a couple of inches. If the frame had been set on a sill with mortises to accept tenons on the bottom of the posts, there wouldn't be a need to square up the frame. Having the bottoms of the posts sitting on concrete piers allowed for some things to be out of square depending on how close to the center they each stood on the piers.

The first thing to do was to insert pieces of aluminum under each post to act as a moisture barrier. I don't want moisture to wick up the piers and into the posts. Rot wouldn't be a good thing. I had plenty of aluminum from the siding off of an old mobile home that I deconstructed this spring. I used a hydraulic jack to lift each post just enough to slide the pieces of aluminum underneath.

The aluminum moisture barrier helped to provide a smoother surface under the posts for moving them into square. Mark the intern and I attached a come-along from the bottom of a post to the next concrete pier. Applying some pressure with it allowed a few judicious knocks with the 'commander' (aka a beetle -- a large mallet) to adjust the intended posts toward square.

After squaring the frame, we checked the level. I rigged a water level using a hose and some clear rubber tubing at the ends. However, it didn't want to work for some reason. The water in the level wouldn't stabilize. Something was going on. So, we used a line level on a taught string. This revealed two posts that were about 1/2" higher than the other 10 (it was level between these 10 posts). Rather than block up 10 posts with hardwood wedges, we jacked the two high posts about and inch off of their piers, and I then used a chainsaw to shave off enough from the bottom of the posts to bring them into level. This worked great.

Once the frame was square and level, we were ready to move on to the next project: purlins and first-floor floor joists.

Thursday, September 6, 2007

Raising the frame: day two, September 3, 2007

On Monday, September 3, 2007, we continued with the raising. We were blessed with the help of eight people. My goal for the day was to get the rafter sets up. We accomplished that. Here are some photos of our work:

We have the first rafter set (the set includes two rafters, two posts, and a collar tie) assembled and are getting the rigging attached to raise it.

The first two rafter sets are up!

Another view of the first two sets raised. We completed this by lunch time.

The same thing from another angle.

It rained for ten minutes in the early afternoon. We were working on the second-floor floor joists and got rained on a bit. We took a break until the rain stopped.

We lifted the floor joists with straps on either end. Once we had them up, we set them in their mortises.

We had the floor joists in and then inserted wedges in the dovetail joint to tighten them up.

Our third rafter set up. We used the gin pole on the middle two sets. The outer sets we lifted by hand and some help from the ground via a rope.

We lifted the pieces for the rafter sets up with straps like we did the floor joists. Four people were able to lift the 16 foot 6x8 rafter. One of the posts is being lifted in this photo.

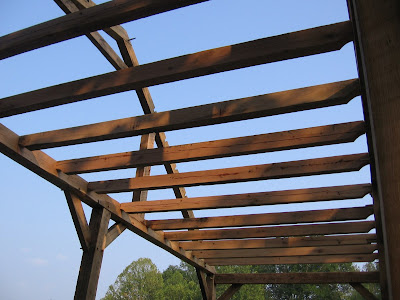
A view of the rafters from below. Just a cool photo.

We're lifting the last rafter set. We secured the ladder and attached a block at the top to help with the lifting. There were three people on the rope. Their job was primarily to help keep it up once it was vertical.

After the rafter set was up, we lifted the girt into place. We had to lean the rafter set on the right out in order to get the tenons in their mortises. Then, we pulled it back together and pegged the girt and braces.

I'm driving a peg into the rafter foot. we used a come-a-long to pull it down so that we could get the peg through the hole. I had also draw-bored (or attempted to) the joints which does put a lot of pressure and pull them together.

Our work for the day. The rafters are all up! There is a second floor!

Another view from the front. The gin pole stands in the middle of the house, waiting to be removed later. No purlins yet, but the rafters weren't inclined to move anywhere.


I took this photo early the next morning. The sun shining through the morning fog added a nice touch.

This is what we accomplished in two days of work! Everyone that helped has a right to feel proud of their work. I am extremely grateful for all of the help!!

Tuesday, September 4, 2007

Raising the Frame: day one, September 2, 2007

I have hundreds of pictures from our two days of frame raising on Labor Day weekend. I won't post all of them here, though. But, there are a few that I would like to share. The set in this post are from Sunday, September 2, 2007.

This is the gin pole that we used. Most of the lifting was done from the 15' height, at the top of the oak 6"x8". It was originally anchored with two 3/4" nylon ropes, but when we started the first lift, they stretched so much that we added a chain to the back of the pole. The upper section on the pole adds about 8-1/2 feet of height using two 2x8s. This section was intended for lighter and higher lifting. It ended up not being completely necessary, but it helped with lifting two of the rafter sets on the second day.

This is the first bent that we lifted. The power for the lift was provided by my neighbor on his Massey Ferguson 235 tractor. The pull rope was a 3/4" nylon rope using a 1:4 block and tackle. It lifted each of these bents without problem.

Once the bent was vertical, we tied it from both sides and braced it with 2xs so that it would stay up.

To raise the second bent of the day, we leaned the gin pole over toward it a bit. Our chain on the back of the pole kept it about a foot from the edge of the first standing bent.

Several of us helped start the second bent as Jerry pulled with his tractor.

Once this bent was vertical, we kept it that way with ropes pulled and secured in opposite directions. We were able to lean the bent outward a little, allowing us to connect the girts between these two bents. We hefted them into place after lifting the second bent.

Before lifting the third bent of the day, we attached the girts and braces to the first bent. Although the braces were sufficient for holding them in their positions, we also used some 2xs to provide additional support, keeping them in place until the next bent was up.

Again, the lifting power was provided by the tractor. We kept watch on all of the lifts to make sure that the bottoms of the posts didn't slip off of the concrete piers. As the bent neared vertical, we guided the tenons on the girts and brace into their respective mortises.

Before lifting the final bent of the day, we decided to try it with the girts and braces already inserted and pegged. Although it added a little more weight and changed the balance as it lifted, it worked quite well.

As the bent came up, the girts and their braces came down and were guided into their mortises.

At the end of the day, the main part of the frame was raised, ready for the rafters. It was a great day, and I am extremely thankful to all the friends and family who helped throughout the day.