Introduction

The 57 acres that comprise Cedar Ridge Farm are located in the beautiful rolling hills of South Central Kentucky. My wife, our four children, and I are on a homesteading adventure as we work toward increased self-sufficiency. We grow much of our own food and enjoy being in touch with the agrarian roots of our lives.

One of the major projects we have undertaken is the building of our own home. The house we're building has three major distinguishing features: 1. we're building it without incurring any debt; 2. it is a timber frame structure; and 3. the exterior walls will be plastered straw bales. We live debt and mortgage free, and building our house with that approach makes perfect sense. Large timbers in a home possess a beauty and project a sense of strength, stability, and warmth that we want in our home. Straw bale walls provide insulation and make ecological sense. This blog is a record of our home-building project.

Sunday, February 7, 2010

Interesting video of a reused timber frame

I found this video at FineHomebuilding.com and thought it was worth sharing. It’s a beautiful old frame that they dismantled, moved, and reconstructed into a home. There are a couple follow up videos also available (you can find them via the link above).


Video Length: 7:01 Produced by: Matt Berger

Winter 2010 update – back to work soon

I guess it’s about time that I update my blog. I’ve been devoting time to my other blog which focuses on some of the things we’re doing on our homestead. Also, there’s not been much happening on the house, so I’ve had little to write about here. That will change now.

Late last summer I hired a pond dug near the house. I wrote a series of posts about that project which you can read here. The pond project was related to the house project since it’s near the house, and we will enjoy year-round views of it from the house.

Constructing the pond provided opportunity and material to do a little landscaping in front of the house. The slope there was steeper than I wanted it to be, and I’ve wanted to put some fill there to make it slope more gradually toward the garden. I borrowed my friend Mike’s backhoe to complete some of the excavation on the pond and moved a lot of dirt in front of the house.

dumping dirtI used my 1979 F250 with a dump bed to transport dirt from the pond excavation to the site in front of the house. I spread the dirt with a blade on the back of my tractor. There was enough dirt to taper out the slope nicely toward the garden. I sowed some fescue seed on it afterwards last fall. The grass sprouted and got off to a good start.

Following are a few photos taken during the dirt moving process and photos taken at the time I seeded the grass.

 033 053 011 042 043 046

Since then, I’ve done very little work on house. I did get some beech logs drug out of a friend’s woods and staged to have them milled. The milling of them has been postponed because of the weather. It’s a bit wet and muddy over there right now. Previously when we were going to mill them, it stayed below freezing for two weeks which resulted in frozen logs. Another friend is going to bring his Woodmizer over to mill them, and he was concerned about how cold it was that day and how hard the frozen logs would be on his blades. So, we’re still trying to reschedule. The lumber from the logs will be used mainly for the porch floor.

We changed another aspect of our floorplan. We’re going to extend space out on what would have been the porch on the front west side of the house. This ‘bump out’ will be 12 feet wide and 9 feet deep (extending out from and between the corner and first post). This will make kitchen space. In fact, most of the kitchen will be in this space and the dining area will move over to where the kitchen was going to be before. We’ll also be enclosing a summer kitchen off this space on the corner of the porch.

So, I have to dig for and pour footers for the block walls I’m going to put under the kitchen. It will only be out as far as the porch around the rest of the house. That’s a project for this spring once it dries up and warms up a bit.

Below are a few recent photos of the house, the pond, and the landscaped front slope. I hope to have some more posts soon. We’re almost to spring when I can get back to work on the house.

Looking at the pond through the frame The front slope The house frame from the pond View of the pond from the house In the snow Another view in the snow

Tuesday, July 28, 2009

Grading around the perimeter

Yesterday I was able to finishing plastering the surface bonding cement on the blocks around the house. So, this morning I began grading the dirt around the house. My objectives were to push at least some of the dirt up to the walls and to level off the top of the hill in front of the house.

Last spring when I dug the cellar, I piled the extra dirt from the excavation in front of the house in order to extend the level of the ground outwards. Eventually, I will have the hill extended further out so that it will slope more gradually toward the garden. For now, I needed to level it off a bit in preparation for building the porch.

Using a grader blade with my tractor, I was able to pull dirt from the middle of the pile in front of the house toward either end and up to the block wall. I pushed the piles of dirt from excavating for the footers on the east side of the house toward the wall and toward the front of the house. In the back, I moved dirt toward the wall and around to the east side of the house. There’s still a bit that needs moved with a shovel, but it’s mostly graded. I wasn’t able to get the tractor and blade on the west side of the house. So, I’ll be moving the dirt on that side with a shovel later.

With the dirt graded around the house, I’ll measure and set some stakes and string for framing the porch. I have to pour footers that go under the porch posts, and I need them to be correctly placed.

014032021   018

Sunday, July 26, 2009

More work on the crawlspace wall

I didn’t realize it has been over a month since I posted an update. I wish I had completed a lot more work on the house since the last post than I actually have. It’s summer time which is busy with many different projects. I’ve endeavored to work at least one day a week on the house. Other projects have included finishing up classes (with lots of papers to be graded), garden work, and making hay among other things.

The house on 7/24/09The boys and I were able to get all of the blocks around the perimeter set in place. This process really didn’t take too long, but the frequent rains we’ve had make it a muddy job at times. I prefer not to slop in the mud and track it all over. So, I tend to put off some of the house work when it’s muddy around the house (which seems to be quite often this summer). Usually, we’re dry around here at this time of year. The weather this summer is quite different than the usual.

The biggest job involved in laying the blocks around the house was hauling them to the house from where I had them unloaded when they were delivered. They aren’t far away, thankfully, just out of the way. I hauled six or seven at a time in the wheel barrow, and the boys worked together to haul two at a time on a hand truck.

Last Friday, we worked on things again, the first time since earlier in the previous week. front wallsill boltsI had purchased several bags of concrete mix and some j-bolt concrete anchors. I mixed concrete in the wheel barrow, filled voids two courses down from the top every eight feet along the walls, and set the anchors. On both sides of the crawl space access door, I filled the voids all the way to the footer. There were also a couple of gaps in the wall that I filled with concrete – I don’t want any access points for mice and other vermin. I need to buy another dozen j-bolts to set between the ones already in place. These will be used to bolt a cedar sill to the wall. I’ll be harvesting the trees and milling the sill beams soon.

Filled gapblock wall

After lunch Friday, the boys and I started coating the back wall with surface bonding cement. We’re going to coat the entire external surface of the block wall all the way around the house. I don’t know that we will coat the inside surface. I’m thinking that it won’t be necessary. Later if I decide it is, it won’t be too difficult to trowel a coating on it. We coated all the back wall and started on the east wall before quitting. In the right photo below, you can see the east wall. Also, laying on top of the wall are two hawks I quickly made for holding the material while troweling. The hole in the wall which is visible was left for running a sewer line out from under the house if the septic tank needs to be set on the east side of the house (I prefer it on the west side).

coated back wallcoating on side wall

After laying the blocks, I ended up with five different levels on the wall, including the root cellar wall. A little more planning on my part would’ve eliminated most of these. However, I decided that it won’t matter, and it won’t. I’m custom cutting the beams for the sills. So, they’ll set the top of the wall at the right height for framing the porch around the house. The surface bonding cement will cover the seams between wall sections and tie them together. Besides, those under the porch aren’t going to be easily seen.

We had rain yesterday and last night. So, it’s a mucky mess around the house today. There’s more rain in the forecast for the next few days. I hope to be able to finish the coating of the walls this week, but I probably will only work on it if the mud isn’t too bad, meaning it needs to dry out a bit first.

Monday, June 22, 2009

The block-work continues

    It’s been hot and humid the last few days. Yesterday’s temperature was somewhere around 93 degrees, or so I was told. I don’t have a thermometer with which to measure the temperature. I do know that it was hot while I worked – I was drenched with sweat. But, that’s to be expected, and it’s not a problem.

Yesterday morning, I finished mortaring the rest of the blocks for first course of the crawlspace wall. south wall from east endThere was about 80% of the back wall to be completed, and it went pretty well.

After finishing the mortaring, I started laying blocks on the front. After about 50 blocks, it was lunch time and time for a dry shirt. After lunch, I continued laying block along the front of the house. It wasn’t long until my shirt was soaked again. I hauled six blocks at a time in the wheel barrow to the corner of the house and set those before getting another load. Meanwhile, my boys hauled two blocks at a time (working together) to stack them on the east side of the house. That way they’ll be ready when I start laying the blocks on that side and the back of the house.

south wall from west endAbout ten feet from the west end of the front wall, I set an access door in the wall. I bought a 32” x 32” door on Friday. These doors are designed to be installed in a mortared wall in which the heights and widths are figured in multiples of eight inches. When dry stacking concrete blocks, you aren’t working with multiples of eight. The blocks are 7-5/8” tall and 15-5/8” long. So, my 32” x 32” door wouldn’t fit perfectly in a two block wide by four block high space.

access doorIt wasn’t a problem though. Because I am laying the blocks on each of the four levels independent of the other levels, it wasn’t a problem to bring the front wall from the east side to the door and then start the next section from the door to the west end. Height wise I wasn’t concerned, because I planned on using the sill for the top of it.

I mortared two four inch high solid concrete blocks onto the first course of blocks where I wanted to put the access door. Using a masonry blade in my circular saw, I cut into the ends of two blocks for the bottom plate of the door frame. It’s made to be mortared between courses which wasn’t going to work for me anyway. Once I set it up four inches on the solid blocks, it also put the bottom plate in the middle of the next course of blocks. It fits nicely in the cuts on the blocks, and they help hold it securely.

The top of the door frame is two inches below the top of the block wall. Once I place the sill on top of the wall, I’ll attach a two inch piece to it above the frame. I’ll also come back and caulk the seams around the frame from the inside to make it tight and secure. I don’t want air gaps around it.

The wall along the front came out acceptably well. It looks good with it there. It’s really nice to see progress on the house, but it sure is a lot of work. I’ve got to get the other walls blocked and then coat all of them. I’ll probably soak a few more shirts before I’m done.

House with front crawlspace wall

Thursday, June 18, 2009

Blocking in the crawl space

We’ve had plenty of rain so far this year. The garden has not suffered from dryness. In between rain showers and storms and all the other work there is to be done around here, I have continued to work on the house. I laid out blocks on the footer last week, figuring where the crawlspace walls need to be in relation the house frame.

011Earlier this week, after some rain and before some other rain, I started mortaring the first course of blocks on the west side of the house for the wall that will be under the mudroom. The first step in the process was to remove some of the accumulated mud that had been deposited around the blocks by the rain. Then, I lifted out the block that was to be mortared into place, and placed some mortar where the block had been.
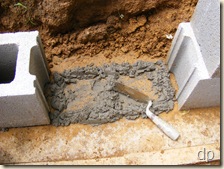
012After distributing the mortar where the bottom edge of the block would set on it, I placed the block back into position. The main purpose for the mortar is to get the first course of blocks level. So, after placing the block on the mortar, I used a piece of wood to get it into place and then checked its placement with a level. I endeavored to make sure that each block was level side-to-side and along the line with the other blocks.

016015

It takes a while to mortar the first course of blocks into place. I was able to complete the ones on the level that will be beneath the mudroom.  It then rained off and on during the next couple of days, and I managed to work on some other things that needed done.

018

I was able to return to the project yesterday afternoon after spending the morning working on my class (I teach a class online for a university). I started by mortaring the blocks along the next level of the footer on the west side of the house. This is a shorter run than the previous level, and it went fairly quickly.

After getting these blocks mortared into level, I began laying blocks. One thing about dry stack concrete block construction is that the block-laying goes quickly. I had to haul the blocks from where I had the block company put them a few weeks ago which is maybe 20 yards away and down hill from the house. I moved six at a time using a wheel barrow. That seemed to work better than using a hand truck.

I began laying blocks for the walls under the mudroom since that mortar was fully set up and cured. After completing laying those, I went ahead and laid the ones on the section I had just mortared. I figured that the mortar wasn’t going to settle or move with the weight of the blocks anyway.

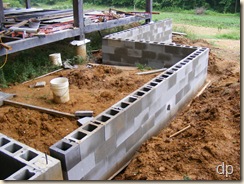
Because of the way I designed and poured the footer, there are four levels for the blocks around the house. I did not worry about making the steps for each level perfect with the other levels so that the blocks could 026be laid seamlessly all the way around the house. Each level can be constructed as a separate wall. Any gaps that may exist between levels will be filled with concrete. Then, the whole thing will be coated with surface bonding cement. I will cut cedars for the sill on top of the wall, so any variation in height will be accounted for in the dimensions to which I cut them. This simplified the figuring and block laying for me.

I saw a block wall a couple days ago for which the footer appeared to have been poured on an angle matching the slope of the house site. The blocks appeared to have been cut along the bottom so that the top would be level. I didn’t want to do that much cutting. I think my method will work all right.

025In anticipation of plumbing that I’ll do later, I cut a hole in one block before laying it. This hole will allow me to run the sewer pipe to the septic tank through the wall. I am not completely sure where the septic tank will go at this point. So, I’ll cut another hole on the opposite side of the house, too, just in case I need to place it on that side. I knew I didn’t want to cut a hole later.

022As can be seen in the photo to the left, I didn’t lay out the end wall on the cellar exactly right. It doesn’t line up straight with the crawlspace wall I just laid. I can’t change it, of course, and it really won’t create much problem. I expect that it won’t be very noticeable later anyway.

A thunder storm rolled through just after I started writing this post. I was planning on working on the front crawlspace wall this afternoon. It may be too muddy now. I’ll see in a little while.

 

      021  024033

Tuesday, June 2, 2009

Perimeter footer

With enough rain-free weather, I was able to complete the forms for the perimeter footer on Tuesday of last week. There are four levels for the footer because of the slope of the house site. I didn’t want to excavate the trench for the footer the same depth all the way around the house.

footerOn Wednesday morning, I called the local ready mix concrete company to order four yards of concrete. They were able to bring it out right away. It didn’t take long to pour the concrete. Dad and I screeded it which also didn’t take long. The footer is 14 inches wide, 8 inches thick, and has two 5/8” rebar pieces in the middle.

About an hour after we finished, a small rain storm came through. It didn’t dump much rain, but what rain that did fall fell hard. The concrete hadn’t had enough time to set up hard enough not to be affected by the rain. exposed aggregate because of rainThe main effect was that some of the cement and sand on the surface was washed away, leaving the courser aggregate exposed and loose on top. This occurred most dramatically to the footer at the front of the house because the runoff from the roof on that side hit directly on the outside quarter of the footer. You can see in the photo to the right the effect it had. It won’t really matter, though. The first course of blocks will be set onto the footer with mortar, and, once the walls are finished, the footer will be covered with dirt, never to be seen again.

footerfooter

I will begin laying the blocks this week as time allows. There are a lot of other jobs to be done around our homestead and we’ll be having some visitors for part of the week and next weekend (one of Anne’s sisters and her family).

Looking ahead to the order of construction, once the blocks are laid, it will be time to start framing the porch. I’ll have to pour footers for under the porch posts, lay blocks for the piers, and frame the porch deck. At that point I will put down the first floor subfloor, including under where the straw bales will go. I will need to lay down some porch floor boards, whether or not I complete that floor now or later, also. Then, there’s more to be done so that the porch roof can be put on. And, there’s a whole lot more work after that. I’ll keep plugging away, and it’ll get done.
