The evolution of our house planWhen we moved to Kentucky in 2003, we already had intentions to build a house. I had in mind to build a strawbale home for at least three reasons: the insulation value (heating and cooling benefits), the ‘simplicity’ of strawbales for a do-it-yourself project, and the affordability of it. Our idea was to build a nice home ourselves without acquiring a mortgage – a pay-as-you-go project. After spending four years paying off our debts, we were entirely debt-free on May 1, 2003, including no mortgage, and we owned 57 acres of beautiful Kentucky land. It was and is a great feeling!
We moved to our homestead on May 16, 2003. Thankfully, a 1970s-vintage mobile home was already on the property. It was in livable condition, although it needed a thorough cleaning. So, we didn’t have to live in a tent and rush to get more permanent housing erected. Having this home has given us the freedom to develop our home plans to suit our needs. In fact, it’s given us the opportunity to design and redesign several times.
We originally planned our home with load-bearing strawbale walls on the exterior. In this approach, the bales have either concrete- or lime-based plaster on both sides which form stress skins that provide rigidity to the walls. This type of strawbale construction is not uncommon (it has a long history), but it may well be more appropriate for a drier climate than what we experience here in southern Kentucky.
We approached our house design with criteria important to us: affordability, size, and functionality. The house had to be doable on our limited income since we weren't going to borrow money to build it. A large home means more to clean and may not foster the family connections we desire and are building with our children. Any design we came up with had to work for the way we live our lives. Open and connected living areas were important as well as room for storage, including a pantry.
 The first floorplan we created was a one-story structure with a great room, four bedrooms, and one bathroom. We modified our first plan to add another bathroom and reorganize the pantry area
After talking with our friends Scott and Jean who homestead about 30 miles from here, I did some more research on strawbale construction. I purchased Serious Straw Bale: A Home Construction Guide for All Climates by Paul Lacinski and Michel Bergeron. Scott and Jean’s concern had to do with the humidity/moisture levels in Kentucky and the effect that would have on a strawbale home. After more research, we decided that it would be a good idea to move away from load-bearing strawbale walls. A non-bale structure supporting the roof has at least two advantages: the bales can be installed and plastered after the roof is on, protecting them from rain, and if there ever was a problem with moisture in the walls, correcting the problem wouldn’t be as problematic as it would be if the bales were supporting the roof.
I’ve always liked wood and have been drawn to timber frame construction. The large timbers give a sense of strength, and the wood creates a sense of warmth. A timber frame seemed ideal for our home. We have a large number of eastern red cedars on our property, some of them of nice size. We believed that we could harvest enough of these, mill them into timbers of the appropriate size, and construct a frame with them. Cedar is a beautiful wood and would’ve been relatively easy to work with, but we eventually abandoned the idea of a cedar frame (more on this later).

 Our first floor plan with a timber frame in mind was a two-story design. The first floor had a great room, a bedroom, a full bath, and a pantry. The second floor had three bedrooms, a full bath, and was open to the great room. This plan was based around a 24’ x 36’ timber frame – four three-post bents with 12’ bays.

 We redesigned again, seeking to refine our needs and desires. This frame was 32’ x 28’ – four bents with three posts on 14’ centers, two 12’ bays, and an 8’ bay in the center of the house. It was also a two-story design with the first floor having a great room, bedroom, full bath, and pantry. The second floor had two bedrooms and a full bath and was open to the great room.
Once again, we submitted our plans to redesign. There always seemed to be something else we wanted to capture in our plans.  Again, this was a two-story design. The timber frame was to be 32’ x 26’ – we’d changed the bents to have a 12’ side and a 14’ side, rather than two 14’ beams. The first floor no
  longer had a bedroom, rather it had a large utility room and a half-bath off of the hallway near the back door. The rest of the first floor was an L-shaped great room with the kitchen toward the back of the house. The second floor had three bedrooms and two full baths. It was open to the first floor above the front door in the middle bay. We also planned to incorporate a small loft above the two smaller bedrooms. We also talked about having a walk-out basement as our house site seemed ideal for such.
At this point it seemed that we had finalized our design enough that I could begin to calculate our timber needs. I computed design values based upon load on the beams, considering fiber stress, shear, and deflection. These calculations determine the sizes needed for the timbers. I also began making a list of the number of timbers needed. At this point, I began to realize that building the house would take most of my big cedars. I didn’t relish the idea of cutting down so many of our trees, not to mention the difficulty I would have skidding many of them out of the woods because of the inaccessibility of their location (inaccessible for my tractor, anyway). So, I began to explore options. We eventually decided to purchase our timbers from a local (an hour away) Amish sawmill, Cub Run Hardwoods. I’d bought lumber from them before, and they are great to work with. Other mills were unwilling to cut what I wanted (16’, 14’, and 12’ lengths of 8”x8” oak). Cub Run Hardwoods was more than willing to mill white oak timbers for me in the dimensions I requested. So, in February of 2005, I ordered what I calculated I needed to build the frame.
Even after I began working on the frame’s joints in March of 2005, we changed our plans again. We decided that we didn’t need as big a house as we were planning. If we made it smaller, would we be able to finish it sooner? It had already been two years since we moved, and we anxiously wanted to have our home. (We still want it, but we are getting closer.) The site we chose for our house is beautiful. In this photo, our house site is below the walnut tree that is on the left, slightly lower on the hill past the little cedars. This photo was taken in the late afternoon earlier this year as the sun was shining on the tree tops in the distance. It will be nice to have this view out of our house!
We modified what we had already designed into a one story design with two bedrooms. It wouldn’t hurt the children to share a bedroom – it would actually be good for them. We live in a culture that separates families too much. The design would also have a loft above one end of the great room and storage under the eaves above the bedrooms. We changed the frame from 32’ x 26’ to 36’ x 26’, widening the center bay from 8’ to 12’.
 Then, we again redesigned our plan and made the house a story and a half with two bedrooms upstairs. We did this in order to have a second full bath and because we decided having two children's rooms (one for our two daughters and one for our two sons) would be nicer for them in some ways. I changed the frame (mainly the rafters) to transfer roof loads more appropriately. We have ended up with a saltbox design having two bedrooms and some storage upstairs. The first floor has a great room, two full baths, a master bedroom, a small study/sewing room, and
  a stick framed addition on the side for a mudroom and a pantry. The upstairs has two bedrooms and storage areas and is open to the great room.
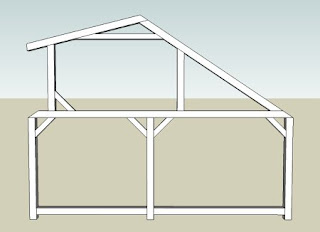 The timber frame bents still have 12’ beams on the back side and 14’ beams on the front. The upstairs allows for two bedrooms, one on either end. I used Google’s free SketchUp to create a render of what the house will look like.
 After purchasing the timbers and beginning to work on the joints in the frame, changes to our design had to leave alone that which was already done. In other words, once I completed the joinery on the tie beams (a 12' and 14' beam with a stop splayed scarf joint connecting them and establishing the depth of the house at 26'), the aspects of the frame they dictated weren't going to change. Similarly, once we poured the footers and piers for the frame's foundation, changes were limited. We've still found ways to creatively include the things we want without compromising the strength and asthetics of the frame.




